Thank you for visiting my blog!! I have moved over to www.tiastoutphoto.com so head over that way to see more awesome photos and behind the scenes!

Sunday, December 15, 2013

Brick and Wood Family Photos Southern Utah Family Photographer

We found this Beautiful house to take pictures at and I just LOVE it! I've already decided I'm going to buy this house someday! haha


Friday, November 22, 2013

Southern Utah Fall Family Photos


I loved taking pictures of this family! Their little girl was such a doll!

Monday, October 21, 2013

DIY photo backdrop for $3

I've had a few people ask about the backdrop that I made for some pictures that I took. Here is the tutorial.

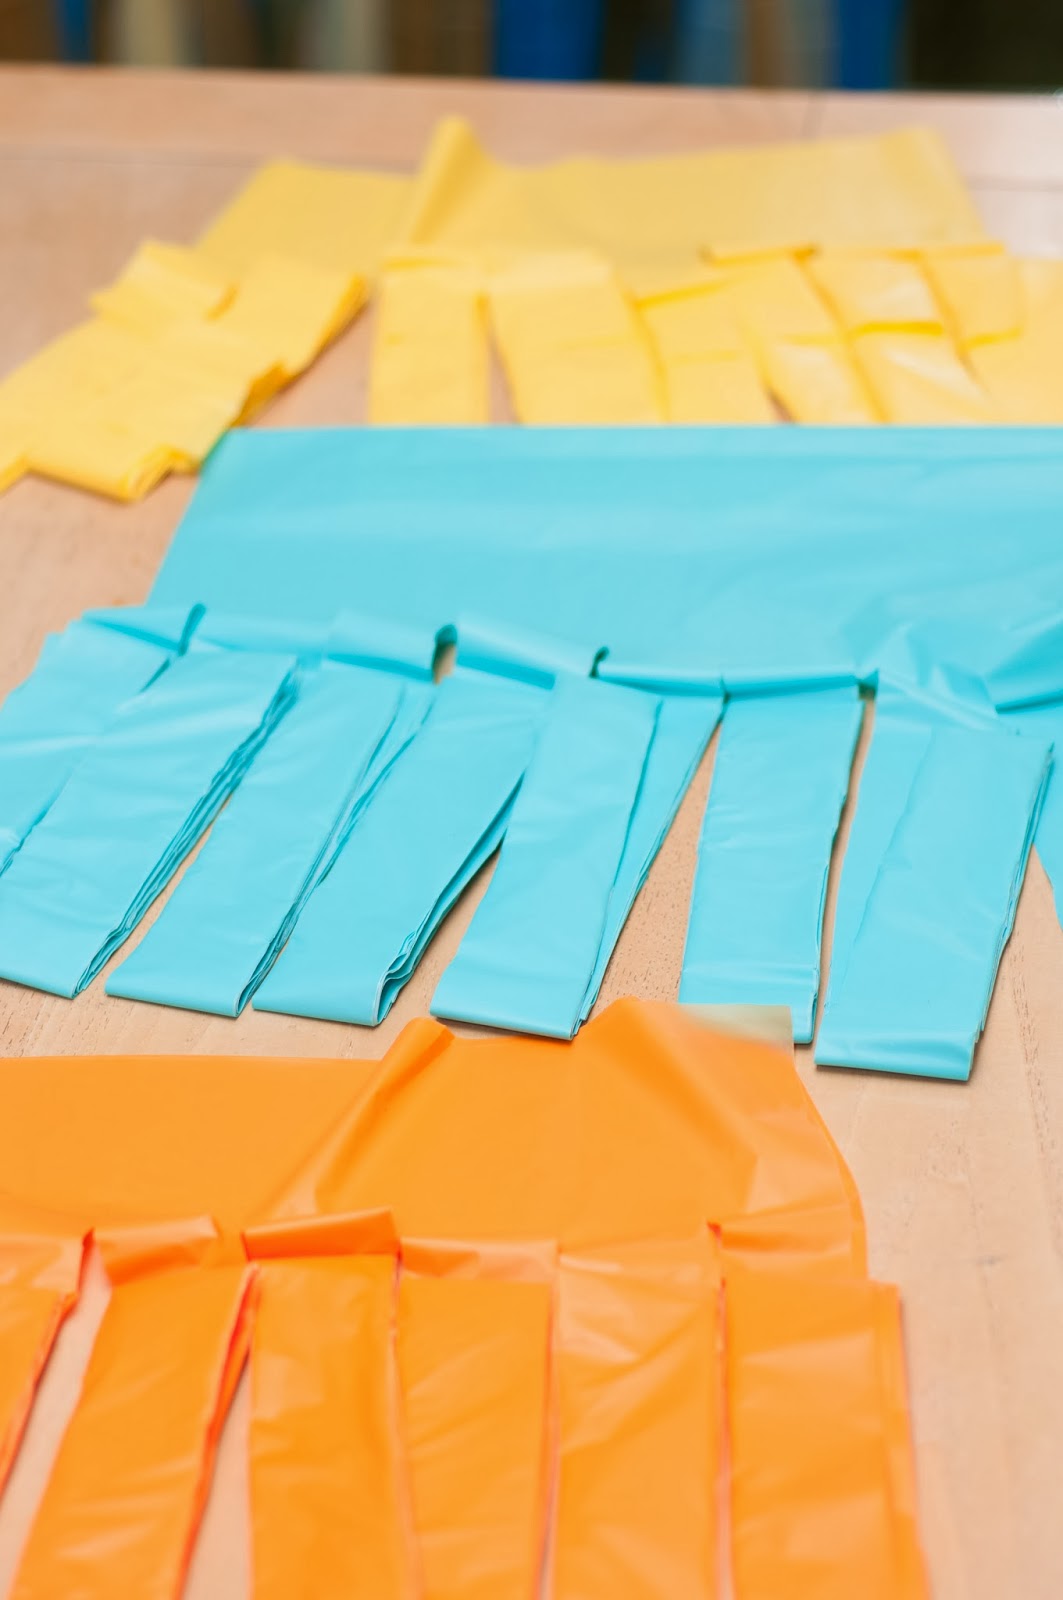
First find 3 (or more if you wish) colored tablecloths from the dollar store. (or walmart).
Don't unfold them all the way! We want to make sure that we leave only 4 layers at the top. You might have to fold some of it over so you can cut it.


 Next we're going to cut it into strips. You can do however many you want. I did 8 strips (with it folded) but I also think that 6 would be good too and give you a bigger, fuller look.


 After cutting all your tablecloths the same way you need to hang them up. Not too high because you'll need to reach the top and if you do it too high your arms WILL get tired.
(sorry if this picture throws you off a little bit but it's a mirror we are trying to hide with the backdrop)


Layer your tablecloths over each other.
You will have some (I had 3) streams that are double. You will need to cut these because when you cut your tablecloths originally they were folded over. You will be able to tell these apart from the others because they will be thicker. Just slide your scissors right up the crease.


 Next start loosly braiding your strands. This is just a super quick loose braid. Then tie a not at the end. If someone is helping you and starting at the other end, I suggest leaving your not super loose then after going through and tightening them so they are at the same level.


Once you've got all that done, hang it up and fluff/tweak the streams to however you want them.  We ended up putting a white tablecloth behind ours just to block our mirror entirely. Hope this isn't too confusing and you have a great turnout on your backdrops!


The color combinations are endless! Leave a link to your backdrop so we can share color combos!


Tuesday, October 15, 2013

Southern Utah Maternity Photographer

I LOOOVVEEDD this session! Even though it was so windy, they pictures turned out so cute!


Monday, October 7, 2013

Did You Know?.........color schemes for pictures

This series of Did you know? is going to focus on color. I LOVE color! Black and white pictures can be beautiful but color can really make an image POP!
When we get pictures taken, I sometimes stress about outfits. I want us to look just right! But sometimes, I  really can't afford to go out and buy ALL of us new outfits. This article might help you in picking out clothes that coordinate from everyone's existing wardrobe.

Firstly let's start with the Primary colors:
Red, Yellow, and Blue.

Now we should know from our time in Elementary school that when we combine these colors, we can get tons of different colors. So let me introduce the color wheel.


Every color on this wheel was born from the primary colors. When we combine 2 primary colors, a secondary color is made. When we combine a secondary color with a primary color, a tertiary color is made.
And the right side of the wheel is classified as "warm" and the left side as "cool".

Now on to color combos.

1. Monochromatic
This is using variations of a single hue. So if we take Blue and have everyone wear a different kind of blue, this would be Monochromatic. This type of harmony feels clean and elegant. You can switch it up by adding tints (hues created by adding white), shades (hues created by adding black), and tones (hues created by adding Grey).
So in the image below, I have taken blue and added white making a blue tint(the top part), and added grey making a blue tone(the middle part), and added black making a blue shade(the bottom part).
 

2. Analogous
 An Analogous harmony uses colors that are adjacent to each other on the color wheel, a tertiary.


3. Complimentary
A complimentary harmony is when you pair two colors that are opposite each other on the color wheel. This harmony adds vibrancy to photos. De-saturating one of the colors can really cause the other to "pop". Using tints, shades and tones will keep this scheme from being "trite" such as a Christmas Red and Green combo. So add some interest and diversity with shades, tints, and tones!

4. Split Complimentary Triad
This is variation on the complimentary scheme. This uses a color, then takes two colors adjacent to it's complimentary.


5. Tetradic
This harmony takes 4 colors that are complimentary pairs.


There you have it! A lesson on colors that can help you pick outfits from the wardrobe you already have! Now mind you that you can deviate from all of these harmonies using shades, tints, and tones. They can add a depth or a brightness. Now go out and experiment with your wardrobe!

info for this Did you Know? was gleaned from Cardigan Empire


Tuesday, October 1, 2013

Southern Utah Child Portrait

I love this Kid! This was a fun shoot. We went out behind our house and found this group of trees. Would you believe this was shot at 11:00 in the morning? LOVE IT!


Add caption

Friday, September 27, 2013

Did you know......Science behind a Smile

I've decided that I'm going to start doing some "Did you know?" posts. I'm putting a lot of work into learning more about photography, and I don't want to keep that all to myself! That would be so selfish of me!
The first post in our Did you know? series is the Science behind a Smile.
Now as a photographer, I can usually tell when someone isn't giving their TRUE smile. Teenage boys are usually really good at the "camera smile" but for some reason don't want their true smile to be captured. I try to approach getting the TRUE smile in 2 different ways: being super silly, or telling them that if they just give me ONE good REAL smile, then Mom will be happy and we can stop taking pictures. With teenage boys, one of those usually works.

Now on the the Science behind a smile.
A smile usually indicates happiness. Happiness is an emotion. With this emotion, only the lower part of the face and the eyes are involved. If there is something going on with the brow/forehead area, you've got another emotion going on.

The main feature of happiness is movement of the mouth. The corners of the lips are drawn back and slightly up. There are the closed smiles with no teeth showing; or a grin where the lips are open and teeth are showing; or a wide grin where lips are open and teeth are parted.

Now while a smile or grin is the most widely known indication of happiness there are also other indications. There are naso-labial folds. These are wrinkle lines running from the nose, out and down to the area beyond the corners of the mouth. These folds can indicate the intensity of the smile. Even if the lips are together, you'll be able to tell the intensity of the smile from the depth of these folds.

The eyes also play a part in an indication of happiness. Some people have crow's feet (I wish my Dad lived close so I could have grabbed a picture of his! They are my favorite part of his smile!) There are also lines that are created below the eye. And sometimes even that little "sparkle" in the eye.

Now a French neurologist Guillaume-Benjamin-Amand Duchenne de Boulogne discovered a sure-fire way to tell if it's a fake smile. It involves both the zygomatic major muscle (which is the one that raises the corners of the mouth), and the orbicularis oculi muscle (which circles the eye). Not very many people can voluntarily contract the orbicularis oculi muscle so this is the real indicator of a true smile. we’re talking about the outer part of the muscle that runs all around the eye socket, and pulls down the eyebrows and the skin below the eyebrows, while pulling up the skin below the eye and raising the cheeks.

I took these pictures of Larson the other day and while you can definitely tell the real from the fake, let me point out the indicators in a real smile.


The fake smile


 The real smile


Some tricks for getting your subject to REALLY smile:
-have them throw their head back and fake laugh (usually they'll REALLY laugh at how silly it is)
-have a good joke on hand
-if you have to...do a silly dance

I think to get real smiles, you have to take a chance to really know them. Get to know them other than just "the person I'm taking pictures of". Talk with them without a camera in sight. I think pictures aren't really about how the person LOOKS, but who the person IS! As a photographer, I try and capture that by getting a REAL smile. (some people just won't give it to you no matter how hard you try, so don't get too discouraged!)

I hope you enjoyed this first segment of Did you know? Please leave a comment if there's anything I can answer for you in my next Did you know? :)

Good night!


*content of this post was acquired from photographyconcentrate.com check them out, they're awesome!